SEO
How to Resize Images In Bulk Using the Terminal

You can use the command line interface, or what is known as the terminal, to resize images in bulk and add them to a new folder. Whether you’re working on optimizing images for a website, preparing files for a presentation, or simply reducing file sizes for storage, the terminal offers a fast and efficient way to handle these tasks. Instead of opening each file in an image editor, you can automate the resizing process for multiple images at once.
In this guide, we’ll explore a specific terminal command that can create a new directory, resize all your images to a specified dimension, and place them in that new folder without affecting the originals. We’ll break down the command step by step, explaining how each part works, and provide practical use cases so you can easily apply this technique to your projects.
Let’s look at how you can leverage sips (a built-in macOS utility) to batch resize and manage images directly from the terminal.
Step 1: Open Terminal

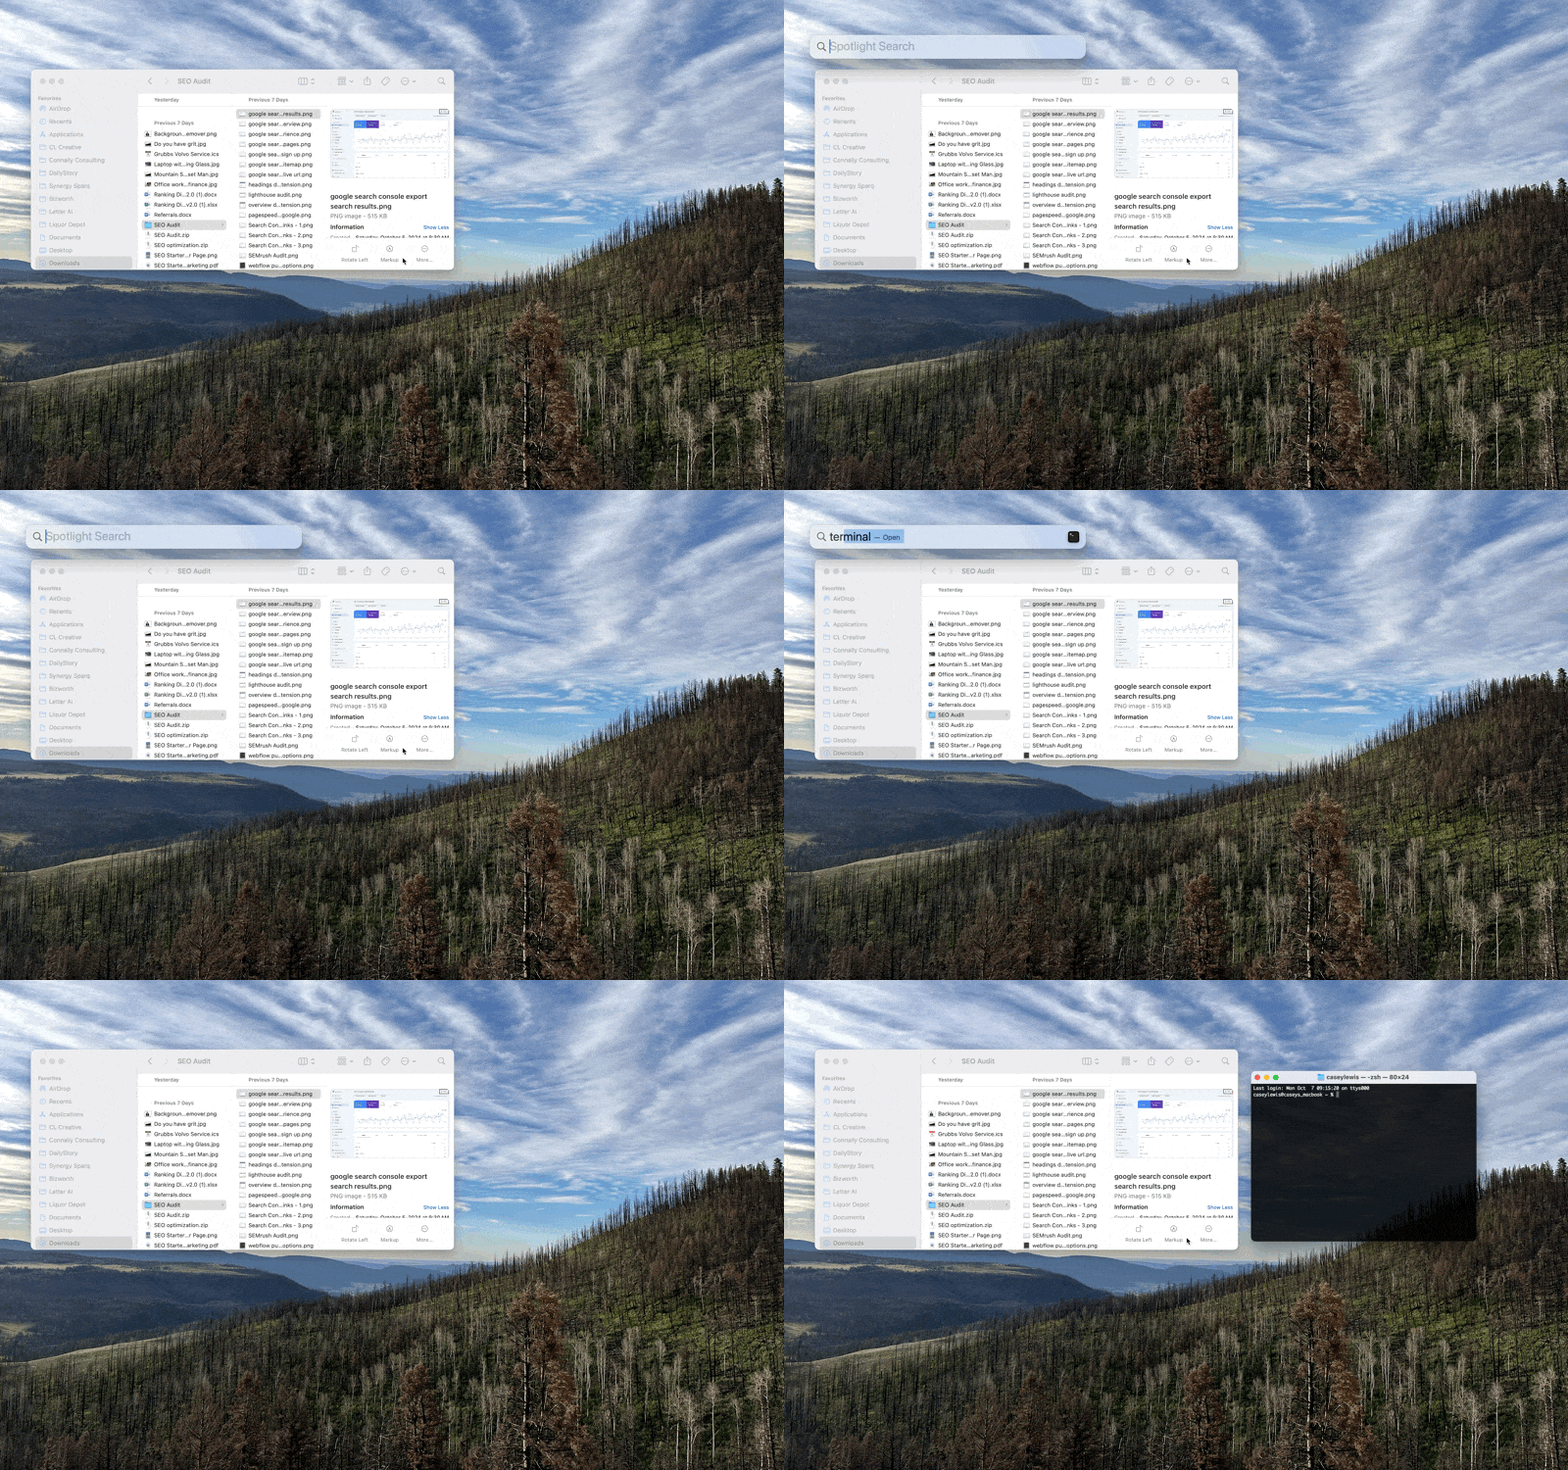
Open the Terminal on your Mac.
- You can do this by pressing command + space bar, which opens Spotlight Search.
- Type Terminal and then press enter.
Step 2: Change Directory to the Image Folder

With the Terminal open, now you want to change the directory to the folder with your images in it.
There are several ways to do this, but I am going to show you a full proof way.
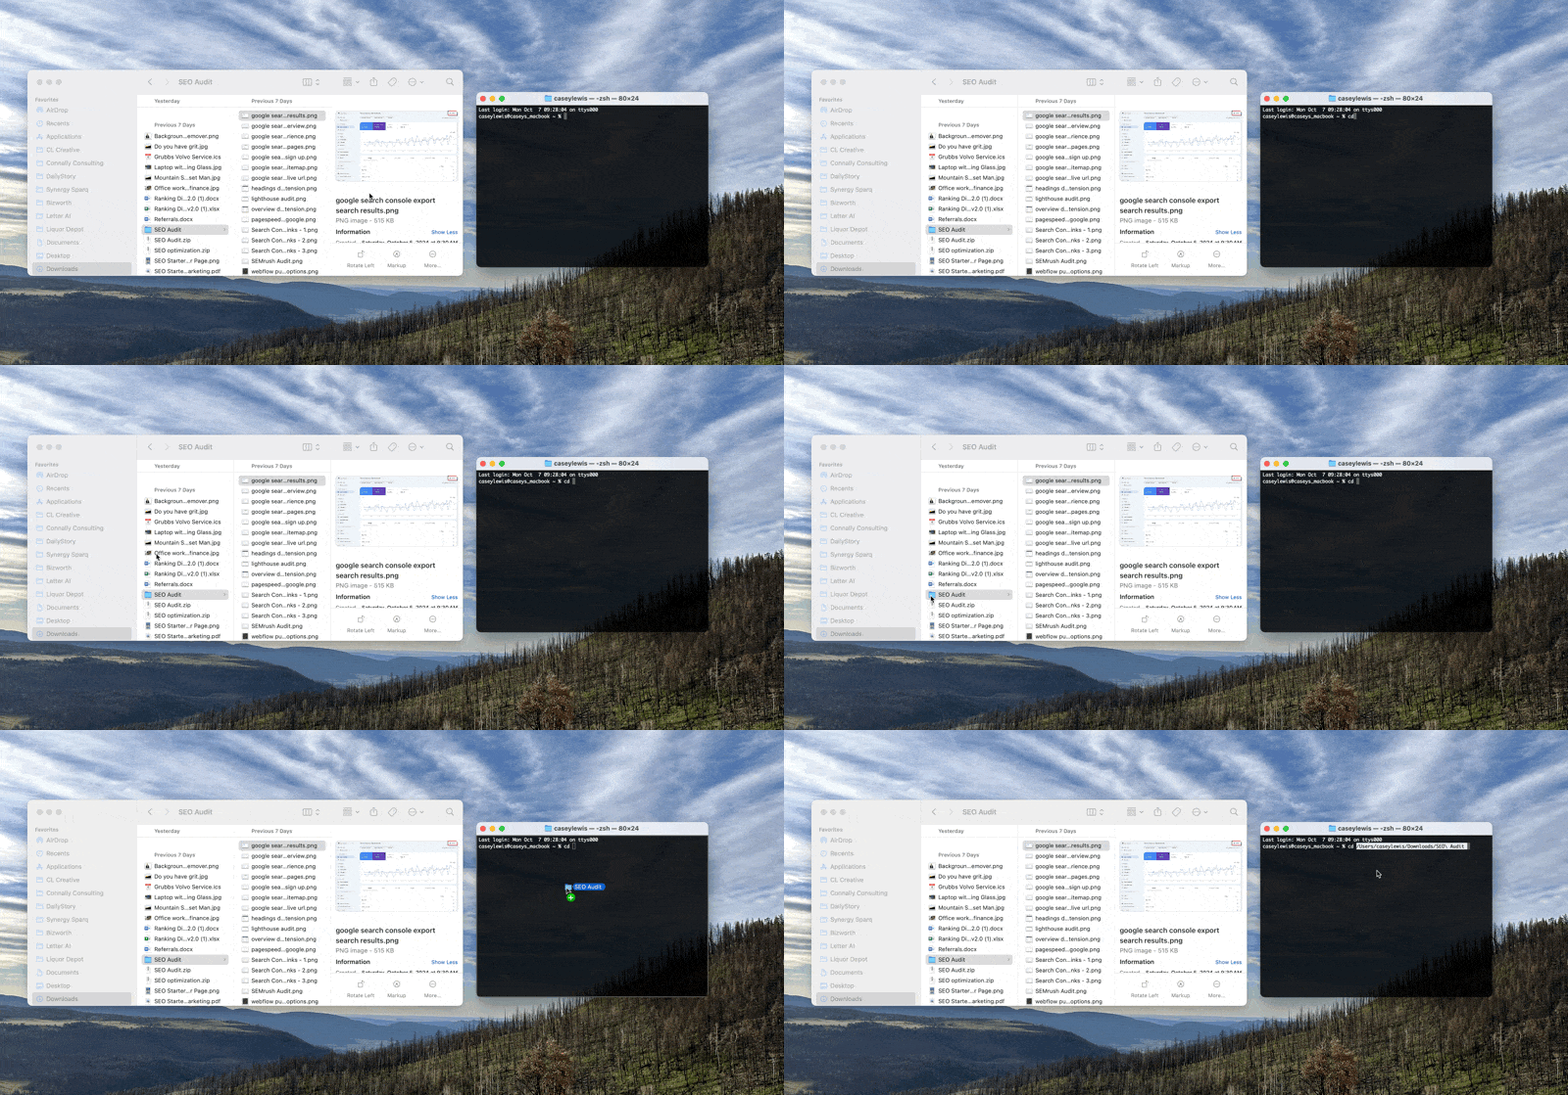
- Navigate to the folder in Finder.
- Type cd in the Terminal and press space (make sure to press space before dragging in the folder in the next step).
- Drag the folder from Finder to the Terminal.
- Bam! The correct file path has been entered.
- Press enter.
- You are now in the image directory (folder).
Step 3: Resize the Images
There are two ways to resize the images. You can resize them in the same directory (folder) or you can resize them and add them to another folder.
Resize in the same directory
If you want to resize the image in the same directory (folder) and you aren’t worried about keeping the originals, then run this command.
sips -Z 1200 *.pngResize and output to another directory
If you want to resize the images and create another folder, keeping the original files in the original folder, then run this command.
This does not overwrite the files, instead it created a new directory (folder), resizes the image files, and outputs them into the new folder, leaving the originals.
mkdir -p resized && sips -Z 1200 *.png --out resized/Understanding the command
If you're working on resizing images on your Mac, the command mkdir -p resized && sips -Z 1200 *.png --out resized/ is a handy tool for batch processing. Let’s break it down step by step so you can understand exactly what it does and how to use it.
1. mkdir -p resized
This part of the command creates a directory named resized. You might be wondering, "Why do I need to create a new directory?" Here’s why:
Imagine you have a folder filled with high-resolution images for a project. These images are too large for quick loading on a website, so you want to resize them to improve performance. You don’t want to overwrite the original high-res images, so you create a new folder, resized, where the smaller versions will go.
Example:
- Original directory: /project/images/
- You want to create a subfolder /project/images/resized/ to store the new, resized images. The p option ensures that the command won't fail if the resized directory already exists.
In this case, the -p ensures the directory creation happens without any errors, even if the folder already exists.
2. &&
This is an operator that tells the command line to run the next command only if the first command (creating the directory) is successful. So, if for any reason the mkdir command fails, the rest of the command won’t run.
3. sips -Z 1200 *.png --out resized/
This part uses sips, a built-in macOS tool, to resize images. Here's how it works:
- sips: Stands for Scriptable Image Processing System. It's a command-line tool that allows you to manipulate image files on macOS.
- Z 1200: This resizes the image while maintaining the aspect ratio. The 1200 indicates the longest side of the image should be reduced to 1200 pixels. So, if you have a PNG image that is 2400 x 1800 pixels, it will be resized to 1200 x 900, keeping the aspect ratio intact. Just be sure to use a capital Z. The capital Z will preserve image rotation along with aspect ratio.
- *.png: This is a wildcard that means “all .png files in the current directory.” The command will apply the resizing to every .png file in the folder where the command is run.
- -out resized/: This tells the command to place the resized images into the resized directory that was created earlier.
Real-World Example: Resizing Images for a Website
Let’s say you’re building a website, and you’re tasked with optimizing images for a blog or online store. Large images can slow down your website, affecting both user experience and SEO rankings.
This command allows you to quickly resize your images without sacrificing too much quality, making them suitable for the web.
Imagine you have a folder full of high-resolution PNG images (e.g., /project/images/). These images are crucial for your gallery, but they are too large for fast loading.
You can use this command to create a subfolder named resized, and resize all images in one go:
mkdir -p resized && sips -Z 1200 *.png --out resized/This does the following:
- Creates a folder called resized inside /project/images/ where the resized images will be saved.
- Uses sips to resize each .png image so that its longest dimension is 1200 pixels.
- Saves the resized images in the resized folder, keeping your original images untouched.
After running this command, you’ll have two sets of images:
- Your original high-resolution images in the images/ folder.
- The resized versions (max 1200px) in the images/resized/ folder, ready for use on your website.
Why Use This Command?
- Batch Processing: Instead of resizing images one-by-one using a graphical tool, you can resize all of them at once with just a single command.
- Avoid Overwriting Originals: By specifying the resized folder, you keep your high-resolution originals intact.
- Aspect Ratio Preservation: The Z option ensures that images are resized proportionally, so they don’t look distorted.
The next time you have to resize a folder full images for a project, reach for the Terminal and sips to easily and quickly resize your images.
If you need to do more than resize your images, maybe you need to reduce the file size, you can use another Terminal utility to convert your images to AVIF. You can learn how to do that in this article: How to Decrease Image Size to Improve SEO
End to End Webflow Design and Development Services
From Web Design and SEO Optimization to Photography and Brand Strategy, we offer a range of services to cover all your digital marketing needs.

Webflow Web Design
We design custom Webflow websites that are unique, SEO optimized, and designed to convert.
Webflow Maintenance
Gain peace of mind knowing that a Webflow Professional Partner is maintaining your website.

Claim Your Design Spot Today
We dedicate our full attention and expertise to a select few projects each month, ensuring personalized service and results.


