Introduction
Setting up tracking solutions for your website can feel like a technical maze. If you’re frustrated by the complexity of installing multiple tracking codes or struggling to make sense of conversion tracking data, you're not alone. Many businesses face similar challenges when trying to gather insights from their website:
- Juggling multiple tracking scripts: Installing different tracking codes for Google Analytics, Ads, and other tools creates clutter and increases the chances of something breaking.
- Missing crucial data: Without proper event tracking, you could be missing out on key insights, like how far users scroll on a page or how often they download a lead magnet.
- Complex implementation: You may have tried adding code manually and felt overwhelmed by the technical skills required.
- Data inaccuracy: Incorrectly firing tags or not understanding when triggers should activate leads to bad data, and bad data leads to bad decisions.
Google Tag Manager simplifies these problems. With GTM, you can manage all your tags in one place without constantly editing your website’s code.
Let’s look at the basics of Google Tag Manager, so you can set it up quickly and collect the right data from day one.
Google Tag Manager Terminology
Before we setup Google Tag Manager, we need to understand its own terminology. You can go deep with GTM, but I’ll keep it to the basics that you need to know to get up and running quickly with Google Tag Manager on your website.
The Google Tag
Google Tag is a tag that is used for tracking. The Google Tag replaced Google’s GA4 Conversion Tracking tag (in case you see others referencing this tag). It is the only tag you need to send data from your website to GA4, as well as this tag works with other Google Products.
Tag
A tag is a snippet of code added to a website to collect and send information to third parties. Tags serve various purposes, including:
- Click tracking
- Scroll tracking
- Re-marketing
- and conversion tracking.
They can also be used to monitor specific events such as:
- Form submissions
- File downloads
- Link clicks
- e-commerce actions like shopping cart removals (More on e-commerce )
Trigger
A Trigger in Google Tag Manager is a set of conditions that define when a tag should fire. Triggers listen for specific events on your website or app, such as page views, clicks, or form submissions, and tell the tag to execute when those events occur and meet the specified conditions we can add to the trigger.
This way you are collecting the data from the event you want to collect data and not other events that might be similar but not exactly what you want.
So you can think of triggers as that which allows you to zero in the tag you created to only fire on the exact action you want to track on your website.
Common types of triggers include:
- Page View: Fires a tag when a page loads.
- Click: Fires a tag when a user clicks on a specific element.
- Form Submission: Fires a tag when a form is submitted.
- Scroll Depth: Fires a tag when a user scrolls to a certain point on the page.
- Custom Event: Fires a tag based on custom JavaScript events.
Triggers can be customized with conditions and exceptions to fine-tune them even more when tags are deployed. This ensures tags fire only when necessary, improving site performance and data accuracy.
Variable
A Variable in Google Tag Manager is a placeholder for a value that can change.
Variables are used to capture dynamic data from your website or app, which can then be utilized in tags and triggers.
They make your tags and triggers more flexible and powerful by allowing you to reference data without hardcoding values.
Types of variables:
- Built-in Variables: Predefined variables provided by GTM, such as Page URL, Click Text, Form ID, and more.
- User-Defined Variables: Custom variables you create to capture specific data, including:
- Data Layer Variables: Pull values from the Data Layer.
- JavaScript Variables: Access global JavaScript variables on the page.
- URL Variables: Extract information from the page URL.
- Custom JavaScript Variables: Use custom JavaScript code to return a value.
- Constant Variables: Store static values that can be reused (we’ll use this one to store our GA4 measurement ID so we don’t have to remember it and enter it in each time we create a new tag).
Variables are essential for:
- Passing dynamic values into tags.
- Creating conditional logic in triggers.
- Enhancing data collection and reporting.
Container
A Container in Google Tag Manager is a collection of all your tags, triggers, variables, and configurations for a specific website or app.
It serves as the central repository where you manage all your tracking codes and deployment rules.
Each container generates a unique code snippet that you embed in your website’s code to enable GTM functionality.
Key features of a container:
- Organization: Keeps all tracking elements organized in one place.
- Version Control: Allows you to create and manage versions of your container setup, facilitating rollbacks if needed.
- Environments: Supports multiple environments (e.g., development, staging, production) for testing changes before they go live.
- User Management: Enables collaboration by allowing multiple users with different permission levels to work on the container.
Using a container simplifies the process of adding and updating tags without directly editing your website’s source code, reducing the risk of errors and improving deployment efficiency.
Data Layer (Optional Addition)
The Data Layer is a JavaScript object that stores and passes dynamic information from your website to Google Tag Manager. It acts as a centralized data repository that tags, triggers, and variables can access. Implementing a Data Layer ensures that data is structured and consistent, making it easier to manage complex tracking requirements.
Benefits of using a Data Layer:
- Consistency: Provides a uniform method for passing data.
- Flexibility: Allows for easier updates and maintenance of tracking codes.
- Separation of Concerns: Keeps marketing data separate from the site’s core codebase.
These are the core components of Google Tag Manager. By understanding these elements — tags, triggers, variables, and containers — you’ll be better equipped to implement and manage tracking solutions using Google Tag Manager effectively.
Now that we’ve covered the fundamental terminology of Google Tag Manager, let's move on to the practical part—how to actually set it up on your website.
Setup Google Tag Manager to Collect Data from GA4
To initially set up Google Tag Manager (GTM) to collect Google Analytics 4 (GA4) data on your website, follow these step-by-step instructions:
Create a GA 4 Property
To gather analytics data, we need an analytics account. Google offers a free service Google Analytics or GA4 for short.
Here is how you get setup with a GA4 Account and Property.
Sign in to Google Analytics
- Go to analytics.google.com and log in with your Google account.
Create a New GA4 Account
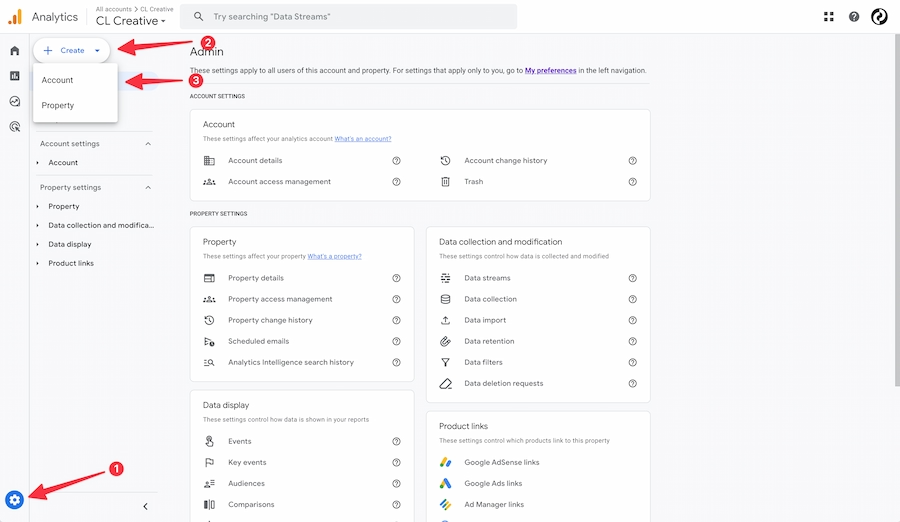
- Click on the Admin gear icon at the bottom-left corner.
- In the Account column, select your account or create a new one (These screen shots assume you are creating a new account).
- If you are setting up Analytics for a new website, you should create a new account.
- When should you setup a new account vs a new property?
- You would setup a new property when setting up multiple websites that would be managed under one account - Think a business that has multiple domains they need to track. You setup a new account when you are setting up GA4 for the first time.
- Most of you reading this are going to setup a new account instead of a new property since you are most likely setting this up for the first time and you only have one website you are going to track.

- Name your Account.
- Determine what Account Data Sharing Settings you want to use and then click next.

- Name your Property. I would suggest using the name of your business for the property name (e.g., “My Website OR My Business Name”).
- Set your reporting time zone and currency.
- Click Next.
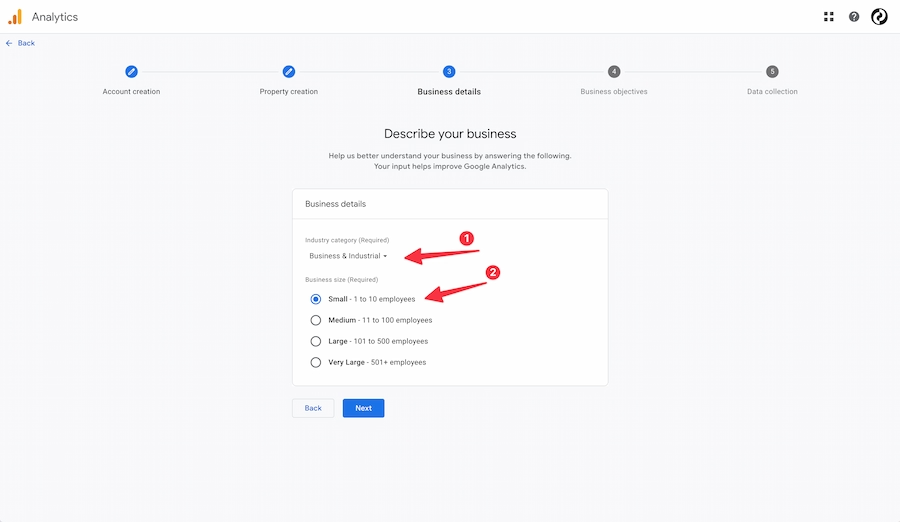
- Provide your business details such as your Business Industry Category and Business Size, and then click next.

- Setup your business objectives.
- These will determine what type of data GA4 shows in your account, so pick the ones that are most important to your business.
- These are general data points that GA4 will create and show you in your account.
- We’ll use Google Tag Manager to create our own, more refined and detailed data points or actions that are important to our business. But for now, click the objectives that are most aligned with your own business.
- Click Create once you make your selections
Set Up a Data Stream

- Choose Web as your platform unless you are setting up tracking for an app. Note: This guide assumes you are setting up tracking for your website.
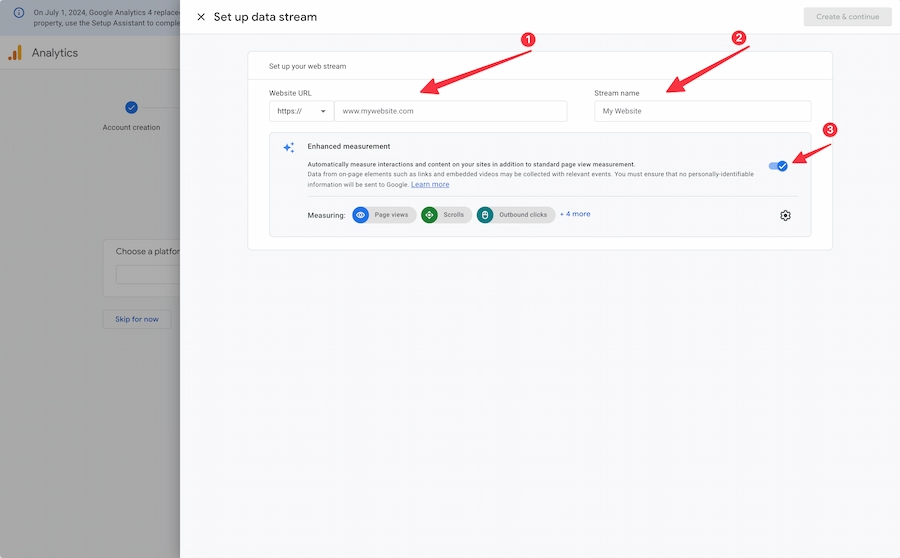
- Enter your website URL and a stream name.
- I suggest naming your stream name the same as your business name. I generally use the same name I used for my Property Name.
- Select Enhanced measurement. This option will be checked by default. I’d recommend leaving it checked.
- Click Create and Continue at the top right once you have entered your information and made your selections.
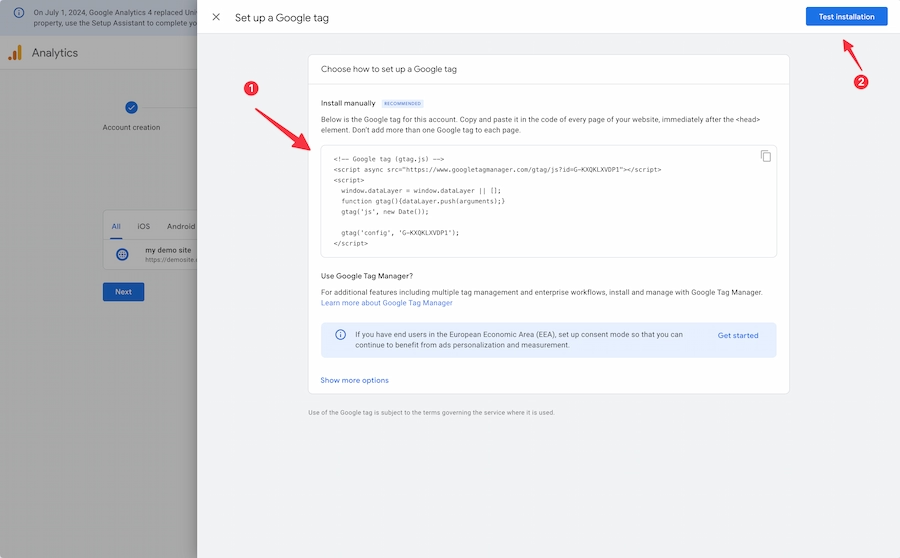
- GA4 will automatically send you to another screen to setup your Google Tag.
- IMPORTANT: If you are NOT going to use Google Tag Manager, then copy the code and place it in the head section of all the pages on your website.
- How you add the code to your website differs for each website builder, so I will not cover specifically how to do this. Google Analytics provides instructions as well as your website builder may provide instructions as well.
- If you ARE going to use Google Tag Manager to collect data, you SHOULD NOT add this code to your website head section. It will be added through Google Tag Manager.
- IMPORTANT: If you are NOT going to use Google Tag Manager, then copy the code and place it in the head section of all the pages on your website.
- Click Test Installation (only if you are not using Google Tag Manager)
- If you chose to use the code instead of Google Tag manager, and you added the code correctly, you will see a success message.
- If you did not add the code and chose to use Google Tag manager instead, you will not see a success message. This is ok, since we will add the code via Google Tag Manager.
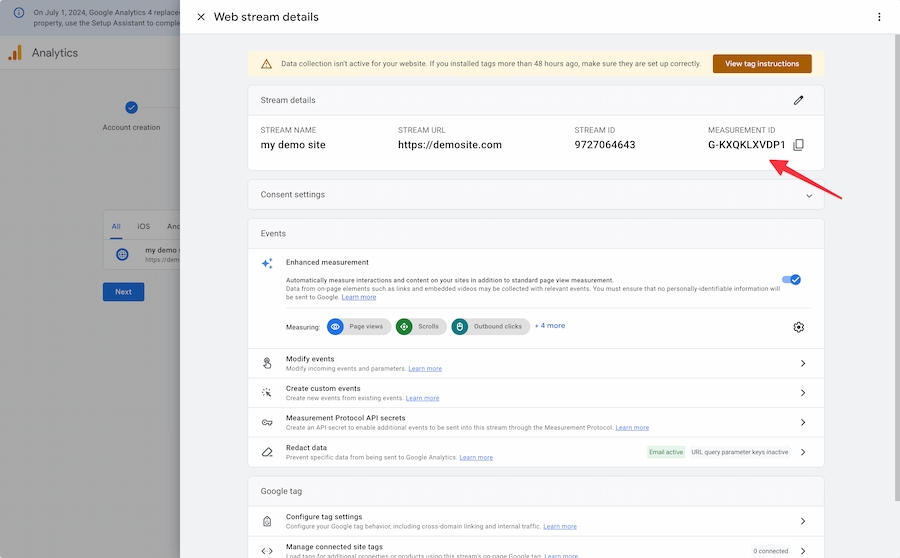
- If using Google Tag Manager, note down the Measurement ID (e.g., “G-XXXXXXXXXX”) from the Web Stream Details page; you’ll need it later when setting up Google Tag Manager.
With a Google Analytics setup, you’re ready to take the next step—setting up Google Tag Manager to streamline your tracking and data collection.
Install Google Tag Manager on your website
To initially set up Google Tag Manager (GTM) to collect Google Analytics 4 (GA4) data on your website, follow these step-by-step instructions:
Create a GTM Account and Container
- Go to tagmanager.google.com and sign in.
- Click Create Account.
- Enter an account name (usually your company name).
- Select your country.
- Under Container Setup:
- Enter a container name (usually your website URL).
- Choose Web as the target platform.
- Click Create and accept the Terms of Service.
Install the GTM Snippet
- After creating the container, you’ll receive two code snippets.
- First Snippet: Place it within the <head> tag of every page on your website.
- Second Snippet: Place it immediately after the opening <body> tag of every page on your websites.
- Add these snippets to your website’s HTML files or through your CMS platform.
- Save and publish the changes.
Connect to GA4
Now that we have a Google Tag Manager account and we have the Google Tag Manager code on our website, its time to use Google Tag Manager to collect data from our website for GA4.
The first thing we need to do is create a connection between Google Tag Manager and GA4.
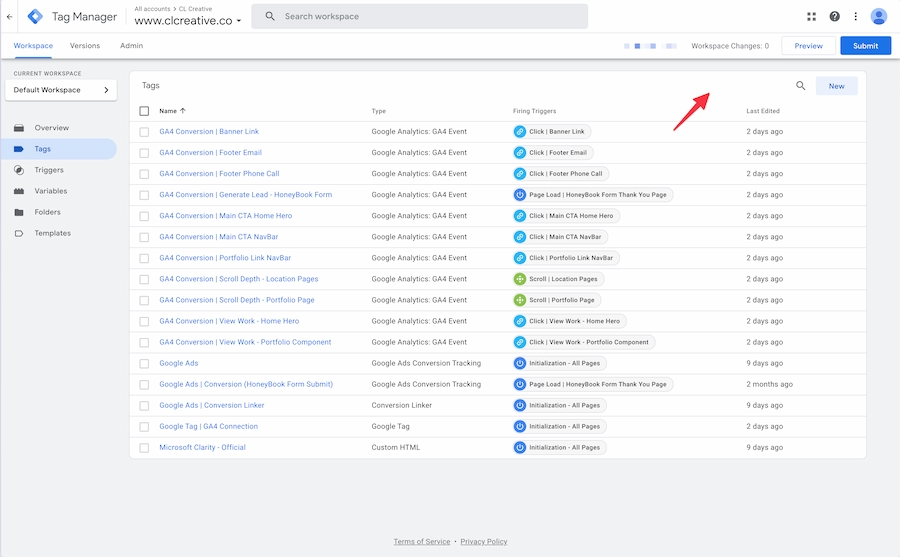
- In Google Tag Manager. On the side bar there will be a label entitled Tags
- Click Tags, then click new to start adding a new tag.
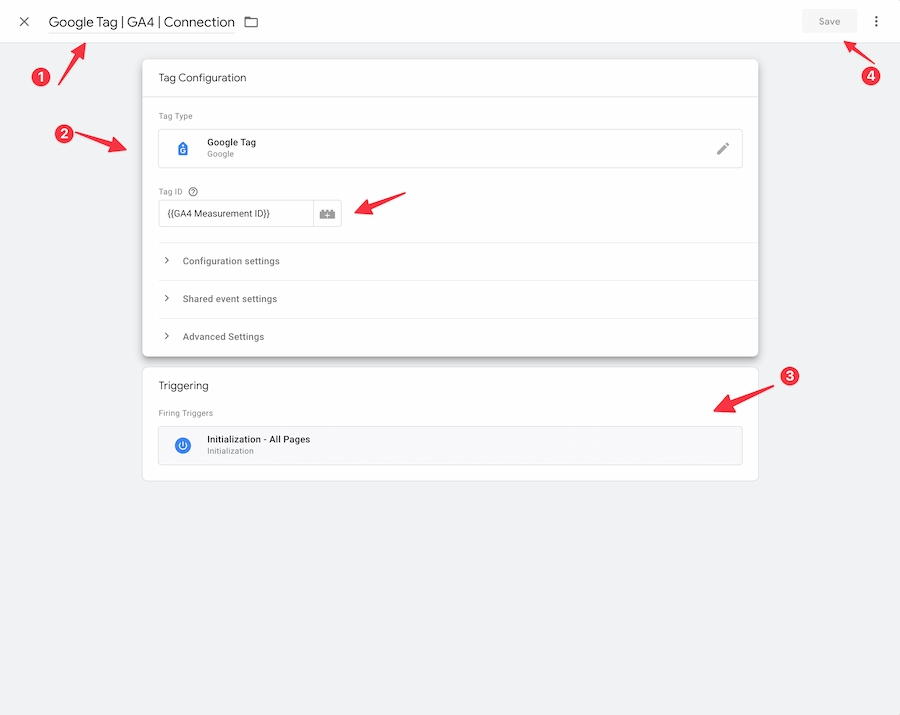
- (1) Name your tag: Google Tag | GA4 | Connection
- (2) Tag Type —> Select Google Tag (The Google Tag allows us to send analytics to GA4 using the GA4 measurement ID)
- Get your Google Analytics Measurement ID
- This is the measurement ID you should have written down earlier. If you didn’t write it down, then you’ll need to go back to GA4 and collect it.
- In Google Analytics (GA4)
- Click Admin —> Data Stream —> Data Stream for Your Website —> Measurement ID (Top Right Corner)
- Back in Google Tag Manager (GTM)
- Click on the lego block looking icon in the Tag ID section. This will allow you to Create a Variable.
- We will create a GA4 measurement ID variable.
- Creating a GA4 Measurement ID variable allows us to reuse our GA4 Measurement ID across multiple tags without having to copy and paste the GA4 measurement ID every time.
- Click on the Variable Button
- Click on the Plus Button - Top Right
- Click on the lego block looking icon in the Tag ID section. This will allow you to Create a Variable.
- Get your Google Analytics Measurement ID
.avif)
- Name your variable: GA4 Measurement ID
- Variable Type: Select Constant
- Add GA4 Measurement ID in the Value box. This is the measurement ID that you copied from GA4.
- Click Save
- Now we have our measurement ID saved in our Google Tag Manager account. From this point on, we can reuse this variable each time we setup a new tag.
- (3) Trigger: Once you click on the Trigger select Initialization - All Pages (number 3 in screen shot)
- This will fire the tag on all pages of the website before any other tag fires apart from those tags used for consent.
- It is best practice to use the initialization - all pages triggers because it will fire before a page view trigger will fire providing us with more accurate data since someone could click off the page before it fully loads.
- Click Save
Preview Mode
Once you have your tag setup, it is time to preview the tag to make sure it is working.
Click on the Preview Button at the top of the screen.
That will open up a the preview screen. You’ll enter in your website url and then click connect.
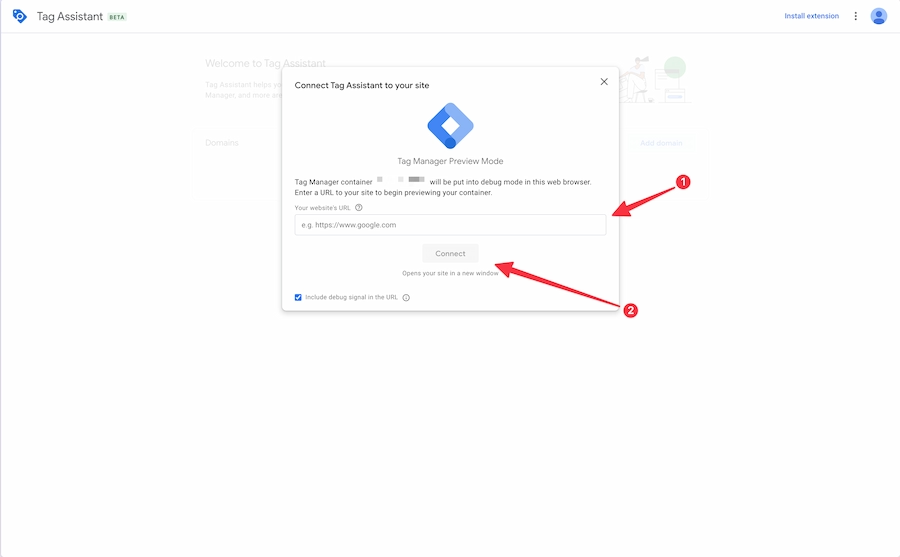
A few seconds after you click connect, another window will open up - this should be your website.
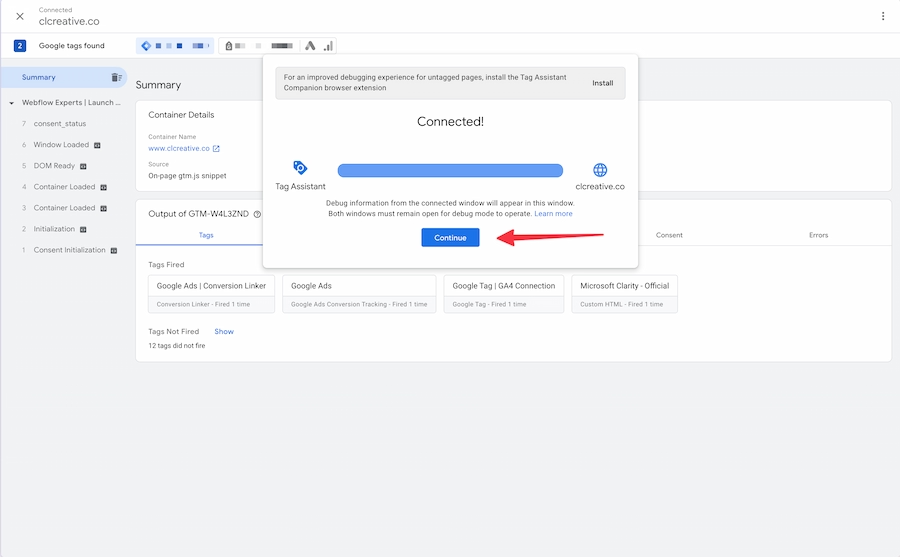
Once that window opens, navigate back to this window and click continue.
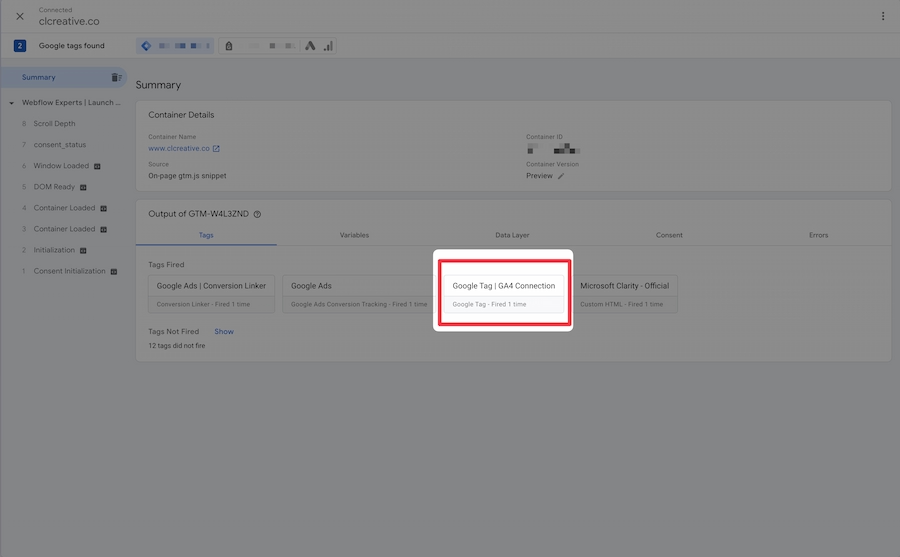
After you click continue, you want to look for the tag I have highlighted (assuming you name it the same in the steps above). This tag tells you that your connection is active and you will be sending data from your website to GA4 using Google Tag Manager.
Now that we have checked our connection, we need to publish our container.
Publish Your Container
After you finish setting up your tag, you need to publish your container.

Click the Submit button.
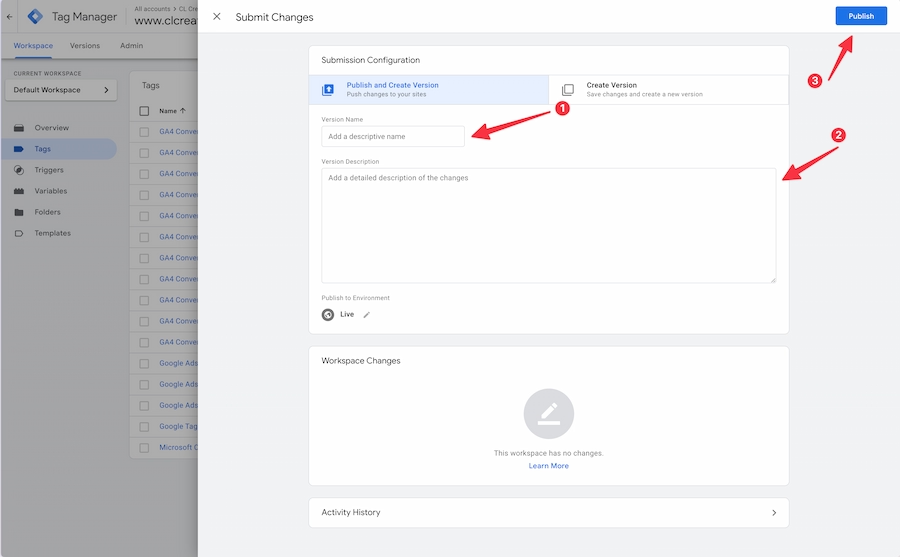
Fill out the fields I have marked.
These are for you to remember what changes you made to your container, so give your version a descriptive name and write some notes in the description section to help you understand what you did. This is helpful incase you have to rollback to another version. You’ll know which version to roll back to.
Then Publish your changes to Google Tag Manager for this to take effect on your website.
- It is very important that you publish all changes you make in Google Tag Manager.
- If you don’t publish your changes, you won’t see any data in Google Analytics (GA4), even though you saw that data was collected in preview mode.
Congratulations, you have setup GA4, Google Tag Manager, and your first Tag that should now be collecting data for your analytics account, using Google Tag Manager.

End to End Webflow Design and Development Services
From Web Design and SEO Optimization to Photography and Brand Strategy, we offer a range of services to cover all your digital marketing needs.

Webflow Web Design
We design custom Webflow websites that are unique, SEO optimized, and designed to convert.
Webflow Maintenance
Gain peace of mind knowing that a Webflow Professional Partner is maintaining your website.


Claim Your Design Spot Today
We dedicate our full attention and expertise to a select few projects each month, ensuring personalized service and results.